Getting Your First Jet Type Rating - Part 3
- Foxtrot Alpha

- Jul 28, 2019
- 8 min read
Updated: Jul 29, 2019


Each training provider you attend is different, some are very advanced, some are very behind the times. I have trained in Edmonton, Vancouver, Ottawa, Toronto, Montreal, Wichita, Dallas, Teterboro and Houston. All of these locations have different methodologies and equipment for you to train on. The Challenger 350 type rating was a very modern course, with the latest technology being employed to help us all learn. Because the training facility was located near the Bombardier factory in Montreal, the training tools were top notch. My instructors would bring to class actual generators, fuel pumps, hydraulic reservoirs, etc. for us to touch, feel and to begin to understand how all these individual components come together to form a system in an aircraft.

An example of a training school that uses high technology is Flight Safety In Wichita, Kansas. I have been very fortunate to be able to attend initial and recurrent type courses at this location. I am always astonished by their use of technology and their ability to adapt to new ways of training, including the use of computer desktop simulation from the very beginning of your course. This innovative way of teaching (which I will focus on in the next blog) seemed so remarkable compared to the lecture style training that I had received on the Boeing 737-200. Why would I be talking about the 737 when talking about getting your first Jet Type Rating? Great question, The 737-200 was my first jet type rating! Yes I went from a turbo prop to a 737, mind you it was an advanced large turboprop, the ATR-42/72.
I cannot blame the companies that I received my training from for their style of training, most of it was inherited due to the age of the technology of the aircraft that we were training on. For instance the Boeing 737-200 is a 1960s vintage aircraft, all of the Boeing supplied training material was on acetates and shown on overhead projectors OHPs. This might seem crazy to some people, especially nowadays in the age of the computer, but during my 737 course there wasn’t one computer in use, it was all done by viewing drawings, reading massive printed manuals, overhead projector images and lots and lots of notetaking.
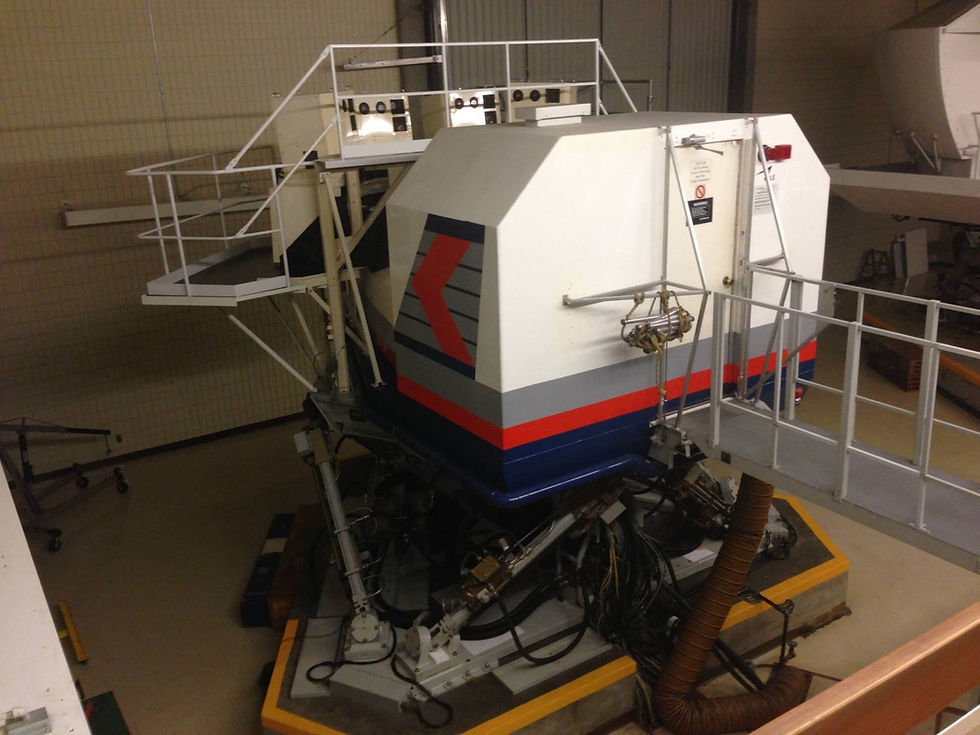
Here is one the few remaining Boeing 737-200 simulators left in the world. I spent many long hours being humbled in this simulator, imagine no GPS no FMS, just raw data VOR and NDB. From day one in the simulator, each student was expected to understand and to have memorized all of the Captain and Copilot flows. Here is an example of the memorized before start flows for the First Officer and the Captain:
First Officer Flow:
v Duct Overheat lights - not illuminated
v Manual Mix Selector Valve Selector - leave alone (check set correctly)
v Dual Bleed - likely on (normal)
v Ram Door Full Open (both open with blue lights)
v Forward Outflow Valve - open (light extinguished)
v Gasper - On
v Config: On/Auto/Off/On/On/On
v Right pack - On
v Isolation valve - Auto
v Left pack - Off
v Left bleed - On
v APU - On (or off as needed)
v Right bleed - On
v Auto Fail - extinguished
v Off Schedule Descent - extinguished
v Standby - extinguished
v Manual - extinguished
v Cruise Altitude - set cruise altitude on flight plan
v Landing Altitude - set landing altitude
v Stby Pressurization - on the pip (300fpm)
v Cabin Altitude - set landing minus 200'
v Flight/Ground Switch - Ground
v Pressurization Mode Switch - Auto
v Flight Director - Off
v Alt Mode - Off
v Pitch Command - full clockwise
v TAT EPR - Test (push to test)
v TAT EPR - set to Climb
v GPWS/TAWS - Press test switch, pull-up, Terrain, etc. GPWS Inop, Inop Light on
Captain Flow:
v Flight Control Panel - 5 Switches Closed (A Pressure - Off, B Pressure - Off, Stby Sys - Low Oil Pres, Feel Diff (on if B sys on - separately 25%)
v YAW Dampner - on (magnetically held open)
v Compass Mode - Magnetic, Magnetic (or DG if in NDA)
v VHF Compass - Normal, Normal
v Fuel Valve Lights - closed (illuminated) off in a ADV aircraft
v Fuel Pumps On - as required (based on fuel onboard, 20,000 fuel all six pumps on)
v Crossfeed Valve - Cycle (bright blue then dim, close - bright blue then dim)
v Galley Switch - on
v Battery Elect Check - 0 Amps, 22 to 30 volts
v APU Elect Check - 0 Amps, 28 volts
v Standby Power Switch - closed, Auto
v CSD Switches - closed, low oil pressure illuminated (both)
v Bus Transfer Switch - closed, Auto
v Gen Bus - as required (normally APU bus on)
v Check TR1/2/3 - Amps 5-15, Volts 24-30
v Equipment Cooling Switch - up, normal
v Emergency Exit Light Switch - closed, normal
v Emergency Exit Light Not Armed Light - extinguished
v No Smoking Switch - on
v Fasten Seat Belt Switch - Fuelling Complete? If fuelling complete - on
v Wiper switch - off
v Window heat - all 4 switches on (4 green lights illuminated)
v Pitot Static Heat - off
v Engine Anti Ice - cycle both (on - bright blue, dim off- bright blue, dim)
v Wing Anti Ice - as installed (ground operating certified only - cycle)
v Ground Interconnect - closed
v System A Hydraulic Pumps - switches on (low pressure lights illuminated)
v System B Hydraulic Pumps - (low pressure lights extinguished, Flight control low pressure lights - extinguished, Feel diff pressure lights - on)
v Brake B Pressure - 2800 psi minimum
v Brake A Pressure - 1000 to 3000 psi (min 1000 psi)
v System B Pressure - min 2800 psi
v System A Pressure - 0 psi
v CVR - Test
v Cabin Differential - 0
v Cabin Altitude - Field elevation
v Cabin rate of climb - 0
v Cabin baro select - (set as installed)
v Smoke Clearance Switch - closed, normal
v Exterior Lights - left to right (position lights steady), logo lights - on
v Engine Start Switches - OFF/OFF
v Standby Compass - Lower
v Flight Director - Off
v Alt Mode - Off
v Pitch Command - full clockwise
v Autopilot - both paddles down (disengaged)
v Flight Instruments: Airspeed Zero, ADI: (stable and erect, no flags, ball centered), Altimeters ____ (29.52" set, Indicating ____ 300 feet), Flap Retract Bug ____ 1314' feet set, Standby Altimeter set, RMI switches (ADF/ADF or VOR/VOR), RMI Heading, HSI Heading, Standby Compass Heading, Heading Bug ____ 081 degrees, Course Pointer ____ 100 degrees), FMS set, VSI set, TCAS above/6 miles, Time is: 12:25 - SET
v FO - Set and Crosschecked
v Capt - Set and Crosschecked
v Standby Horizon - erect
v Total Fuel/Vref Indicator - set flaps 15, set EZFW from flight plan
v Fuel Indicators - Check, complete quantity test (drive down and then return to previous), Total Fuel (all 3 gauges) reads roughly the same as Total Fuel/Vref Indicator
v Fuel Used - reset
v Engine Instruments - EPR 1.0, N1 Zero, EGT Normal, N2 Zero, Fuel flow Zero, Oil Pressure Zero, Oil Temperature Normal
v Engine Oil Quantity - Test (drives down and then returns to previous) Ok for dispatch?
v Anti Skid Switches - ON (both switches closed), anti skid inop lights - extinguished
v Engine Vibration Indicators - check, select turbine and inlet while test switch is depressed, verify 3.5 to 4.5 mils
v Auto brake - Off (RTO on 586), Auto brake disarm/inop light extinguished
v Altitude Alerter - set to 100' below SID altitude until clearance received
v MFD - set (as installed)
v Weather Radar - Standby, set, Tilt full up
v Transponder - set/stby (1000), perform TCAS test 1st flight
v Speed Brake - Down/Detent
v Reverse Thrust Levers - Down
v Thrust Levers - Closed
v Start Levers - Cutoff
v Parking Brake - Set, Light On (brake pressure is above 1000 psi system A and B)
v Stabilizer Trim Cutout Switch - Normal
v Wheel Well Fire Warning - conduct best, not required if done in standby checks with AC busses powered during the fire warning check
v Comm Radios - set, Comm 1 set to ATC, Comm 2 set to company, ATIS, dispatch
v NAV Radios - set to required departure VORs
v DMEs - on
v HF Radios - set as installed
v PDCS - set, load EZFW from flight release "do no enter final load info!"
v Rudder/Aileron Trim - Free and Zero (after moving to 5 units, ensure FO rudder and aileron move)
v Rudder Pedals - adjust to comfort level, ensure both are flush
v Departure Briefing - once clearance is received (brief SID, Noise Abatement Procedure, Engine Failure Procedure).
v Is Fuelling Complete? If Yes, Do we have the correct fuel?
v If both Yes - call for Before Start Checklist First Flight or Thru Flight Checklist to the Line
Each student flew half of their course as a left seat pilot and then as a right seat pilot, hence the need to know both the Captain and the Copilots flows. This meant that before you ever were able to step into this simulator, you had to memorize a series of actions to be taken while in the cockpit (as seen above), nonverbal actions, done quickly and perfectly, or you’re going to hear about it. This was the most grueling course I have ever taken before. As mentioned previously, everything was done old-school, ground school was done by lecture and viewing overhead projector images, no PowerPoint lol.

Inside Vancouver’s Boeing 737-200 simulator, everything looked, smelled and felt like the real 737. My first day in the sim was very busy, after spending an hour or so on flows, we did a departure out of Yellowknife (CYZF), intercepted NDB tracks inbound and outbound. I had some really great instructors in the 737, one of them extremely patient. I had a lot of problems initially with the V1 cut. I had in my mind that the 737 had a lot of power and that I could just power away from the runway during an engine failure. This is simply not the case in a 737-200, The V1 cut is a challenging thing to learn, I was taught squeeze, freeze, 15 degrees! One instructor noticed that I tended to apply aileron during the V1 cut procedure. He taught me to put my hand behind the yoke only, use my feet on the rudders to keep the wings level during the failure and do not apply any aileron, slowly rotate up to 15° and hold it. So what’s the big deal about using aileron, you want to stop the roll don’t you? You see in the 737 when you apply aileron, you also apply roll spoiler. The roll spoiler causes the wing to loose lift on that wing, slowing down your climb speed and eventually you lose so much speed, you are unable to maintain lift. No speed + no lift = crash. Eventually I was able to use rudder and pitch, with no aileron roll to achieve the V1 cut climb attitude. There was a sweet spot for pitch, somewhere from 11 deg nose up, to 15 degrees. If you went above the sweet spot, you would lose speed and lift, and you guessed it, crash! It is really amazing to see a large aircraft lumbering into the sky at such a low airspeed and realize this is normal. After many hours trying to figure this out finally one day I clicked, I was able to perform the maneuver as required and move on in my training.


We were all warned before we went to sim that this was going to be the hardest course that we had ever taken before. For an example, we had an exam at the end of the first week. We were told that if we did not pass this exam, we would not be welcome back into our seat on the following Monday (yep, you we’re fired!). Yes this was a lot of pressure, the exam was for the Boeing 737-200 electrical system, it wasn’t just one electrical system, there we’re multiple systems, because the aircraft that we flew, were all modified. We needed to know how each one of them worked. This was going to be a course that tested our ability as pilots and our knowledge of basic radio navigation flying skills. I can say without a doubt, that this was a very humbling experience for me and I learned very quickly that the skills required to fly this classic jet airliner are tremendous. Image: Boeing 737-200 sim briefing room in Vancouver.

I truly believe hard work pays off, do a good job and be proud of what you’ve accomplished. Image: 737-200 with dual Universal UNS-1FW FMS and an MFD, we had none of this tech in the sim :(
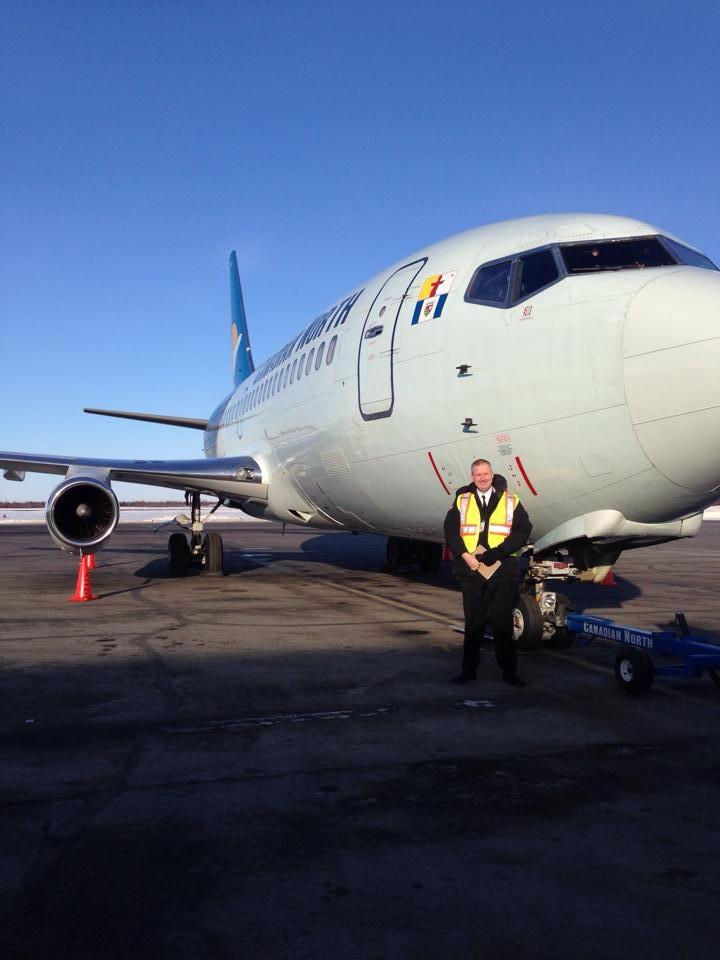
Image: One happy 737 pilot, one of my first line training flights, just having returned from a valley run (Norman Wells, Inuvik, Yellowknife).


Comments